Week of the 08/01/2022 - #31
Contents
tech
- Old Textmode demos
- Stevie - Cool Apple IIe Demo by Samar Productions
- Off-Grid Cyberdeck! The Raspberry Pi Recovery Kit
- Apple //c Arduino Disk Drive
- TheDraw Fonts: ANSI fonts
Old Text mode demos
-
“The Art of Textmode” - Text Art History . YT Assembly ‘04
- Dunno by Sorcerers (1990) - first ever
- Starport by Future Crew (1992) 640x350 (modifed character set). bbstro 6k
- Textro by OTM (1995) - modified character set on every frame
- 13 december by psikorp (xxxx) - tmcd ‘05
- Infekt by Dariros Et Al (2002) - https://m.pouet.net/prod.php?which=8539 / https://www.youtube.com/watch?v=OX68NfbmF8U
- Bolognese by Alpha Design (2003) - https://www.pouet.net/prod.php?which=11376 / https://www.youtube.com/watch?v=7zmK-oopmKY
Stevie - Cool Apple IIe Demo by Samar Productions
“Our first 1983 “Apple 2e” production. Unexpected release to celebrate grand opening of The Retro Computer Museum by Yugorin/Samar on May-29-2021.”

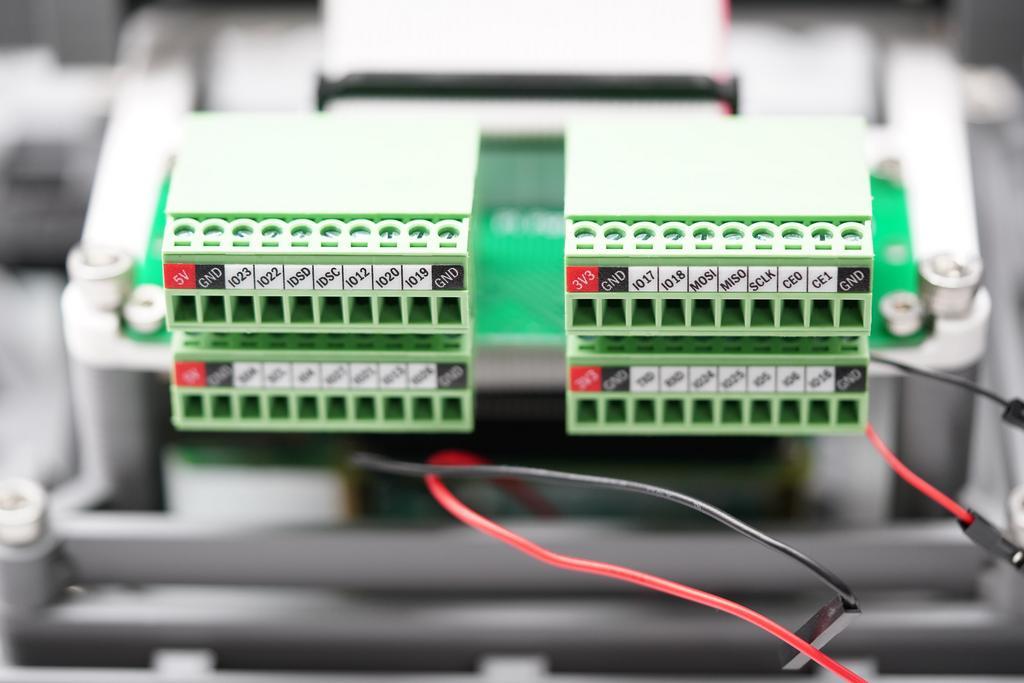
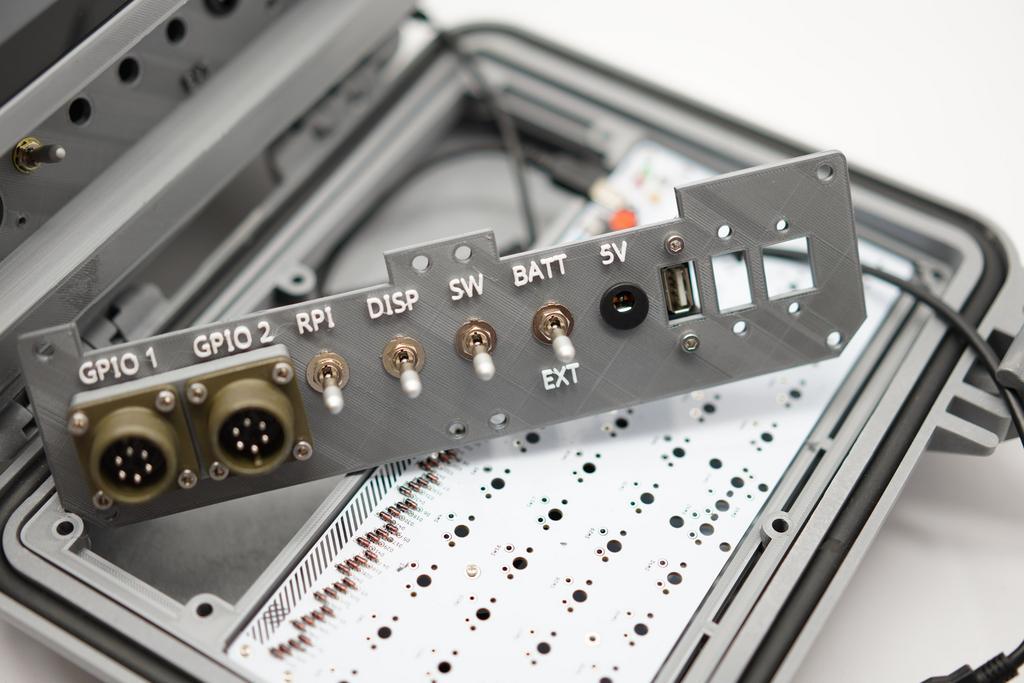
Off-Grid Cyberdeck! The Raspberry Pi Recovery Kit
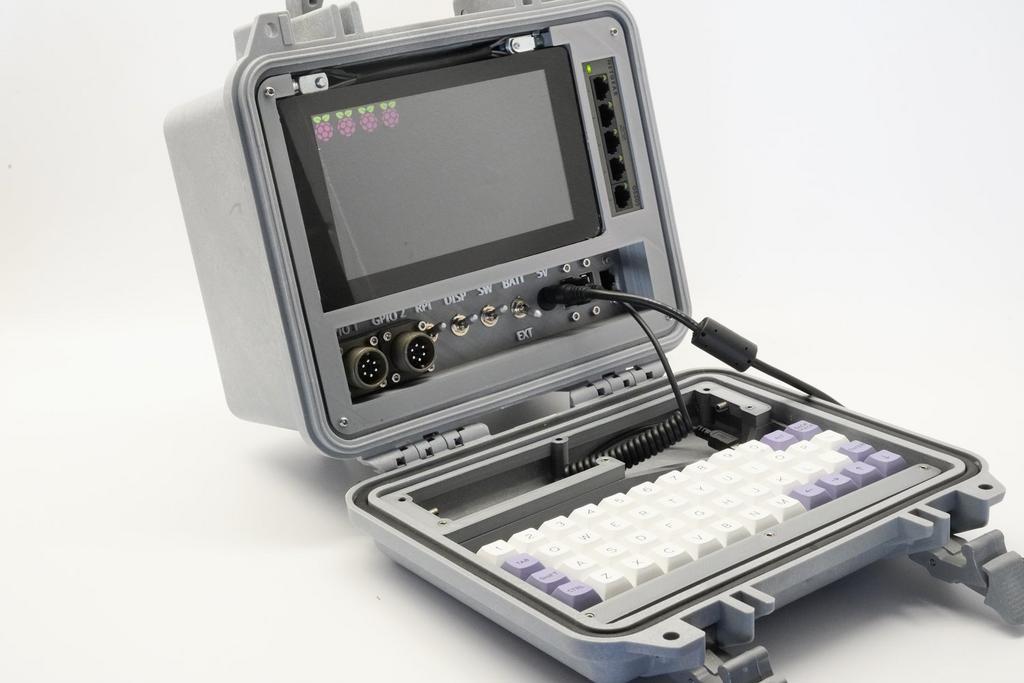
This is beautiful: a Raspberry Pi case, waterproof sealed with a small switch to setup your own private network! They have a great site with all the different models and lots of pictures and information.
- The Recovery kit
- back7 website - “Located in Carlsbad, California, back7 LLC focuses on providing unique and innovative approaches to rugged and mobile computing. We are comfortable with a variety of tools, processes, and materials. Our specialty is in 3D designed and fabricated parts for boutique and industry-specific applications. We are avid supporters of the Open Source, Maker, and USA-based manufacturing efforts. Click on Services to learn more about hiring us, or take a look at the Build Log for past projects you can make at home.”
- Build logs and lots of other info
- Instagram page

Apple //c Arduino Disk Drive
This weekend I finally decided to try to connect an SD card + Arduino to my old Apple //c. I was hopping I would be able to use the Smartport project I mentioned last week but it turns out my //c has an old ROM version and whats around is not usable. I can try to upgrade the ROM to a Rom4x using an AM27c256 EPROM which has the same pinout as the Apple //c ROMS but I can’t get my hands on a programmer. I thought about building a programmer but the fact that I need to have two voltage levels makes it too complicated to me.
The Smartport project got me thinking: perhaps I can hook the Arduino to the port on my //c and convince it its a disk drive. The Apple II stores the information in a complicated way but the woz image format really preserves that so all I need to do is stream the bits from the woz image to my Apple //c.
The first task was connecting the ph0-ph3 signals to the Arduino and simulate the disk head. That was pretty simple to do and worked more or less as expected. The real problem comes when you need to send the bit stream to the IWM (Integrated Woz Machine). The first problem was that I wasn’t sure how the bits where being transfered. After much reading I came to the conclusion that the drive produces a 1us pulse for a logical 1 and none for 0. Each pulse is spread 4us apart and the way the information is stored on the disk guarantees you never have more than a pair of 00 together. I think this is how it works since I managed to send two consecutive bytes to the boot code @$C600 and managed to get it to this stage. Unfortunately the third byte has problems. My guess is that the timing is off. The main problem is that the Arduino digitalWrite() function takes too long and the delayMicroseconds() is not very precise when the delay is short.
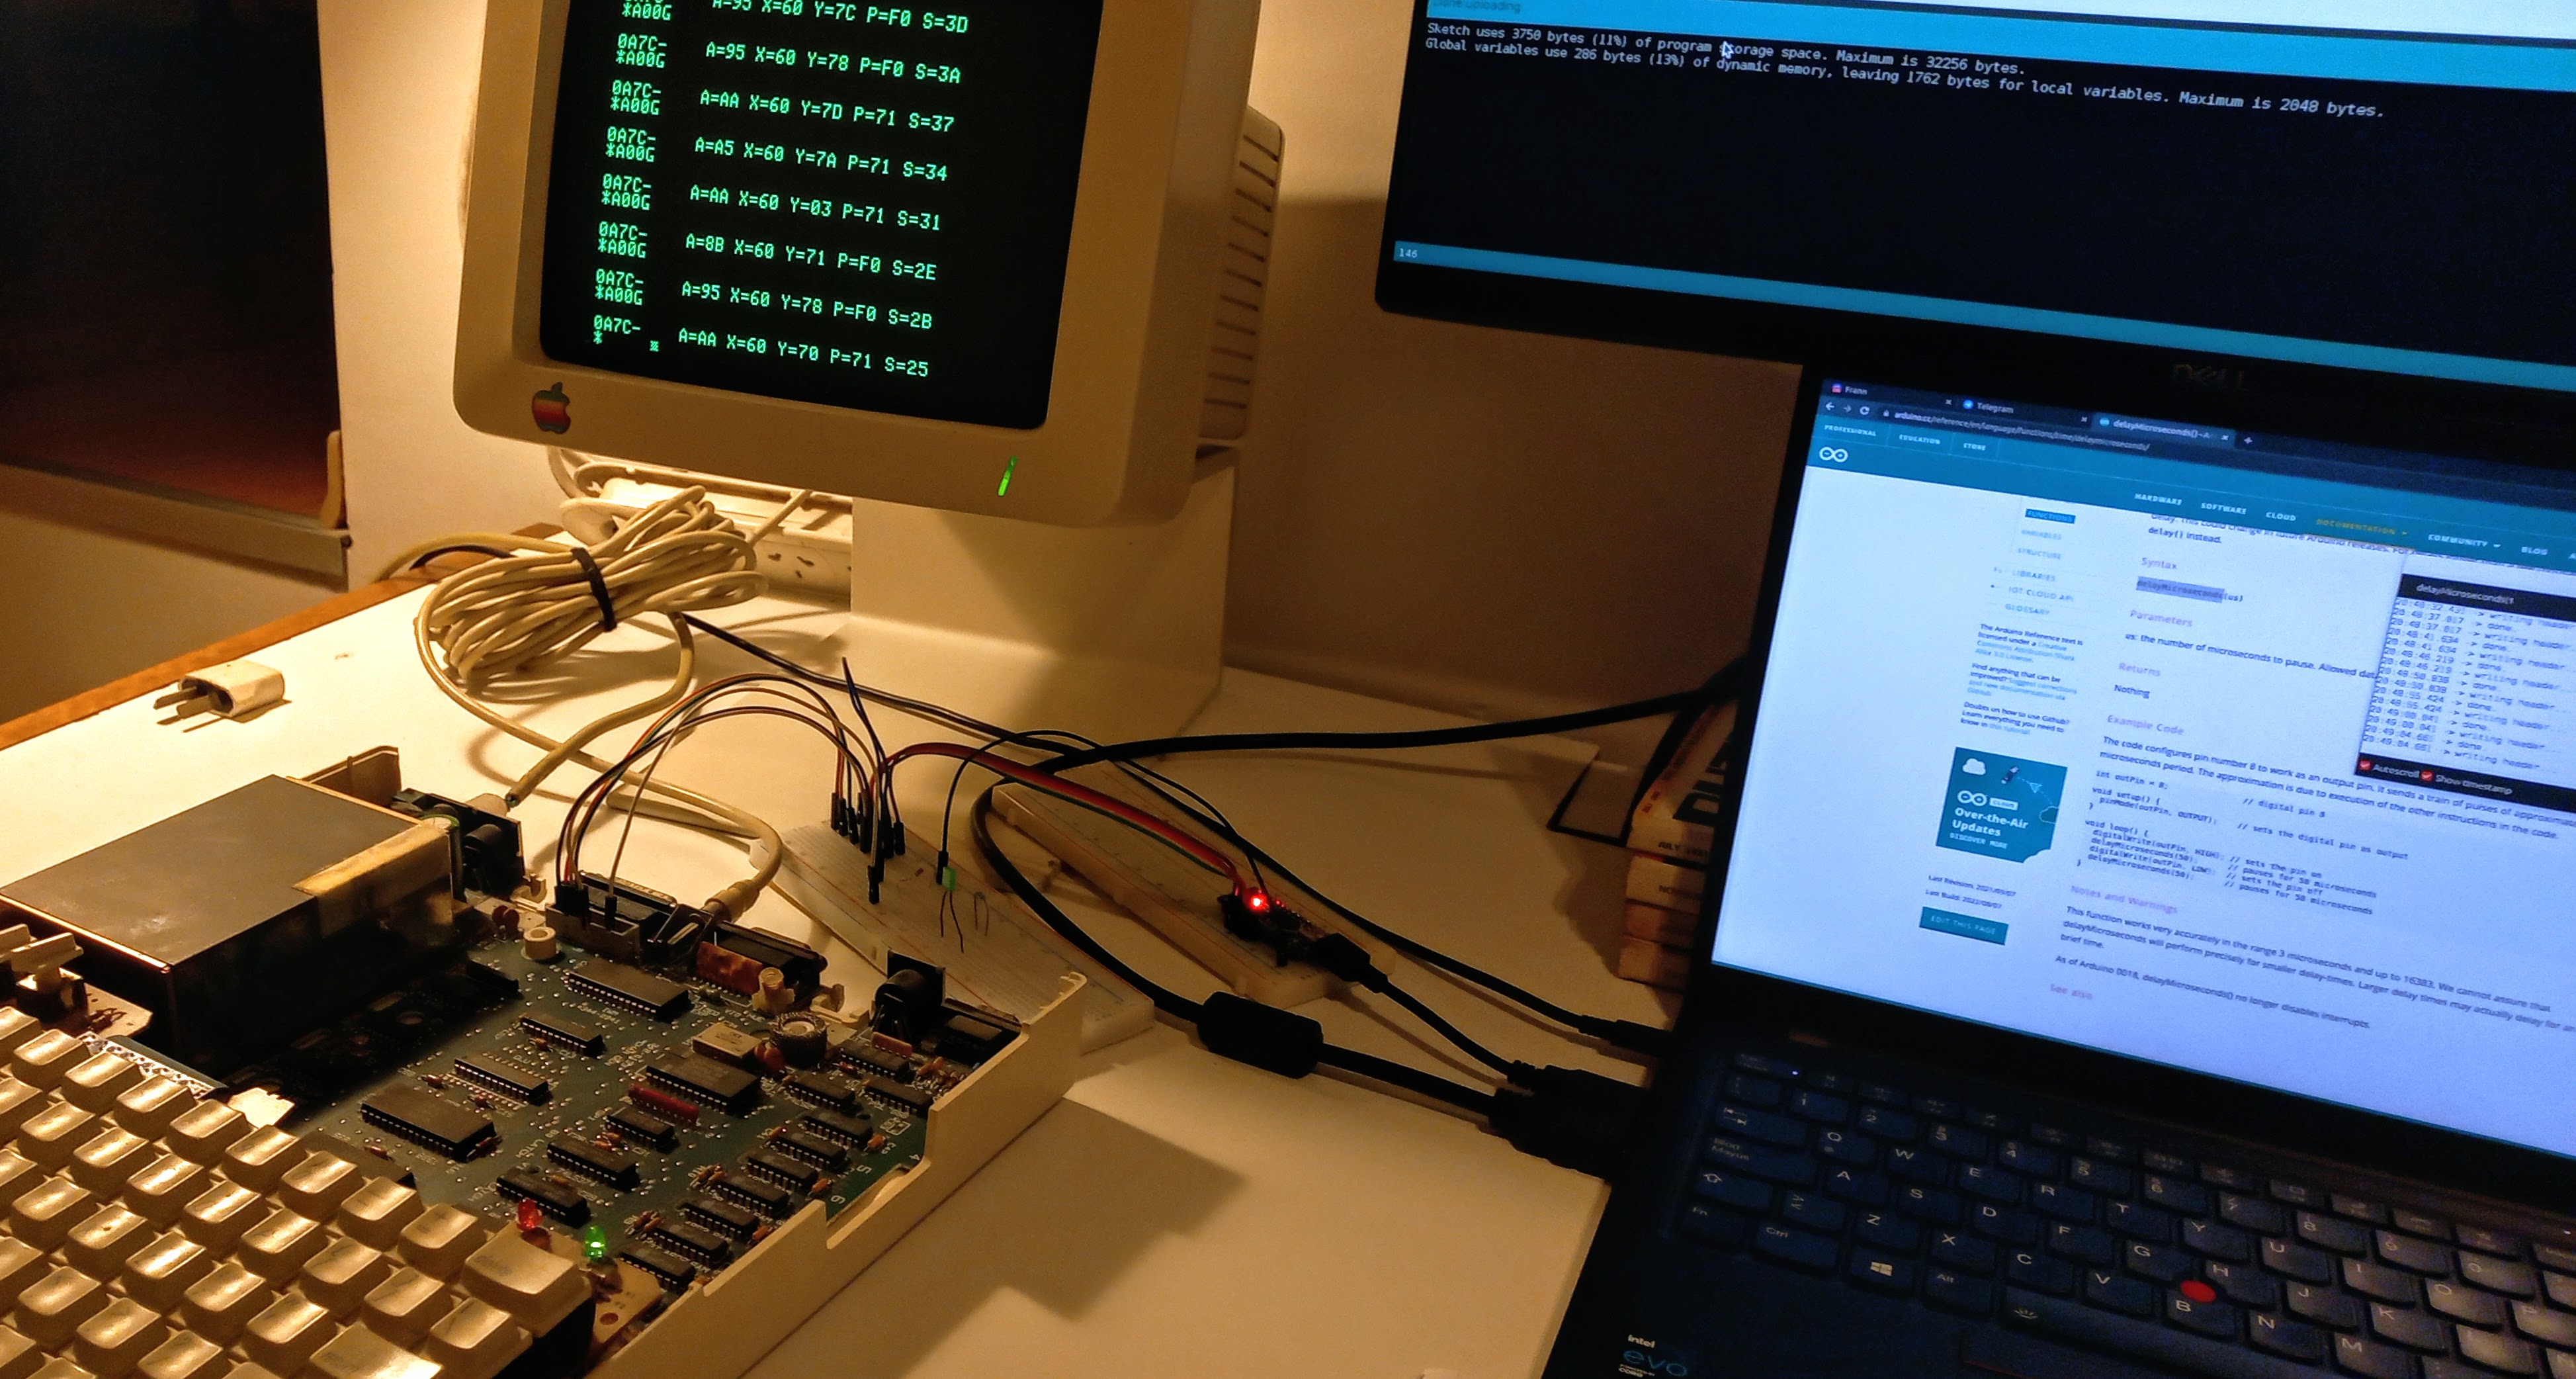
Here’s what I have so far:
- The boot code at
$C600starts doing two important things: move the head back to track 0 and then search the disk for 3 bytes:0xd5 0xaa 0x96which indicates the beginning of a sector. - I wrote an
.inothat tracks the movement of the head by watching theph0-ph3lines and then repeatedly send the 3 bytes. - To see what is going on I copy the code from
$C600to$A00. Then I add aBRKinstruction after the second match so that when I have read the0xAAcode it stops. - I tweak around the parameters of the delays until I get it to break.
- Unfortuntately for some unknown reason I manage to get it to read two bytes but whatever I put on the third byte will almost always fail. My guess is that the timing is off.
This is what I do:
]CALL-151

*
*A00<C600.C6FFM
*A7A:00
*A83:00
$A5EL

0A5E-    BD 8C C0     LDA    $C08C,X
0A61-    10 FB        BPL    $0A5E
0A63-    49 D5        EOR    #$D5
0A65-    D0 D0        BNE    $0A57
0A67-    BD 8C C0     LDA    $C08C,X
0A6A-    10 FB        BPL    $0A67
0A6C-    C9 AA        CMP    #$AA
0A6E-    D0 F3        BNE    $0A63
0A70-    EA           NOP
0A71-    BD 8C C0     LDA    $C08C,X
0A74-    10 FB        BPL    $0A71
0A76-    C9 AA        CMP    #$96
0A78-    F0 09        BEQ    $0A83
0A7A-    00           BRK
0A7B-    90 C2        BCC    $0A3F
0A81-    D0 BC        BNE    $0A3F
0A83-    00           BRK
*A00G
...
Arduino Sketch
This is my work in progress to try to figure the way to send the information so that the IWM can read it. It’s all about timing. Not sure how I’ll make this dynamic but for the moment what I want is to be able to get the format correctly. Here’s the sketch:
#include "track.h"

#define OUTPIN         12

// https://www.best-microcontroller-projects.com/arduino-digitalwrite.html
#define setPin(b) ( (b)<8 ? PORTD |=(1<<(b)) : PORTB |=(1<<(b-8)) )
#define clrPin(b) ( (b)<8 ? PORTD &=~(1<<(b)) : PORTB &=~(1<<(b-8)) )

// the setup function runs once when you press reset or power the board
void setup() {

  pinMode(OUTPIN, OUTPUT);
  pinMode(CLOCKPIN, OUTPUT);

  Serial.begin(38400);
  Serial.print("\r\n\r\n\r\nConnected to Apple //c\r\n");
}

// the loop function runs over and over again forever
void loop() {
  char msg[40];
  unsigned char phases, prev, next;
  int currentTrack = 80;

  prev = 0xff;
  while (1) {

    if (currentTrack == 0) {
      send_header();
      continue;
    }
    phases = (PIND & 0x3c) >> 2;
    if (phases == 0 || prev == phases) {
      continue;
    }

    // The 1st time we don't know which way to move
    if (prev == 0xff) {
      prev = phases;
      continue;
    }

    next = (prev >> 1);
    if (next == 0) {
      next = 0x8;
    }

    if (phases == next) {
      if (currentTrack > 0) currentTrack--;
    } else {
      if (currentTrack < 80) currentTrack++;
    }
    sprintf(
      msg, "On Track %d.%d.  phase: %02x next: %02x\r\n",
      currentTrack >> 1, ((currentTrack & 0x1) == 0 ? 0 : 5),
      phases,
      next
    );
    Serial.print(msg);
    prev = phases;
  }

  Serial.print("The End");
}

// ============================================================================
// We tweak theses parameters to get the timing right. This *almost* works
//      1us
//      ___                                  ___
//     |   |                                |   |
//     | 1 |               0                | 1 |
//  ---+   +-------------+------------------+   +--
//     |                 |                  |
//     <----- 4us ------> <----- 4us ------>
//
// ============================================================================

#define LHI            3
#define LHILO          4
#define LLO            6

void send_header()
{
  int  repeat;

  clrPin(OUTPIN);
  Serial.print("writing header...\r\n");
  for (repeat = 0; repeat < 30000; repeat++) {

    // 0xD5 11010101 -------------------------
    // 1
    setPin(OUTPIN);
    delayMicroseconds(LHI);
    clrPin(OUTPIN);
    delayMicroseconds(LHILO);
    // 1
    setPin(OUTPIN);
    delayMicroseconds(LHI);
    clrPin(OUTPIN);
    delayMicroseconds(LHILO);
    // 0
    delayMicroseconds(LLO);
    // 1
    setPin(OUTPIN);
    delayMicroseconds(LHI);
    clrPin(OUTPIN);
    delayMicroseconds(LHILO);
    // 0
    delayMicroseconds(LLO);
    // 1
    setPin(OUTPIN);
    delayMicroseconds(LHI);
    clrPin(OUTPIN);
    delayMicroseconds(LHILO);
    // 0
    delayMicroseconds(LLO);
    // 1
    setPin(OUTPIN);
    delayMicroseconds(LHI);
    clrPin(OUTPIN);
    delayMicroseconds(LHILO);

    // 0xAA - 10101010 ------------------------------------
    // 1
    setPin(OUTPIN);
    delayMicroseconds(LHI);
    clrPin(OUTPIN);
    delayMicroseconds(LHILO);
    // 0
    delayMicroseconds(LLO);
    // 1
    setPin(OUTPIN);
    delayMicroseconds(LHI);
    clrPin(OUTPIN);
    delayMicroseconds(LHILO);
    // 0
    delayMicroseconds(LLO);
    // 1
    setPin(OUTPIN);
    delayMicroseconds(LHI);
    clrPin(OUTPIN);
    delayMicroseconds(LHILO);
    // 0
    delayMicroseconds(LLO);
    // 1
    setPin(OUTPIN);
    delayMicroseconds(LHI);
    clrPin(OUTPIN);
    delayMicroseconds(LHILO);
    // 0
    delayMicroseconds(LLO);

    // 0x96 10010110 -------------------------------------
    // 1
    setPin(OUTPIN);
    delayMicroseconds(LHI);
    clrPin(OUTPIN);
    delayMicroseconds(LHILO);
    // 0
    delayMicroseconds(LLO);
    // 0
    delayMicroseconds(LLO);
    // 1
    setPin(OUTPIN);
    delayMicroseconds(LHI);
    clrPin(OUTPIN);
    delayMicroseconds(LHILO);

    // 0
    delayMicroseconds(LLO);
    // 1
    setPin(OUTPIN);
    delayMicroseconds(LHI);
    clrPin(OUTPIN);
    delayMicroseconds(LHILO);
    // 1
    setPin(OUTPIN);
    delayMicroseconds(LHI);
    clrPin(OUTPIN);
    delayMicroseconds(LHILO);
    // 0
    delayMicroseconds(LLO);
  }
  Serial.print("done.\r\n");
}
References
- “Beneth Apple DOS” by Don Worth & Pieter Lechner (chapter 3: Diskette Formating)
- “Understanding the Apple II” by Jim Sather (chapter 9: The Disk Controller)
- “Integrated Woz Machine (IWM) Device Specification”, revision 9.
- Trecker - This project is doing something similar: he uses an Arduino to read the data off an actual Disk Drive. He has sample code which is very helpful.
- DigitalWrite - This articles describes in detail how to speed up
digitalWrite()to manage to get things in time.
Project Photos 📷

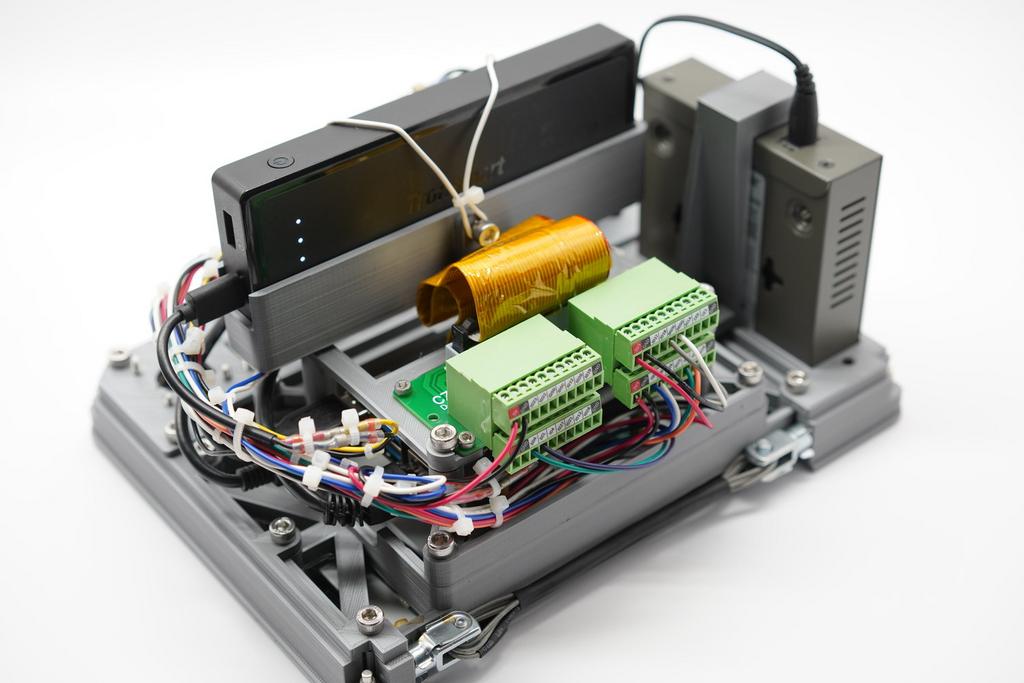
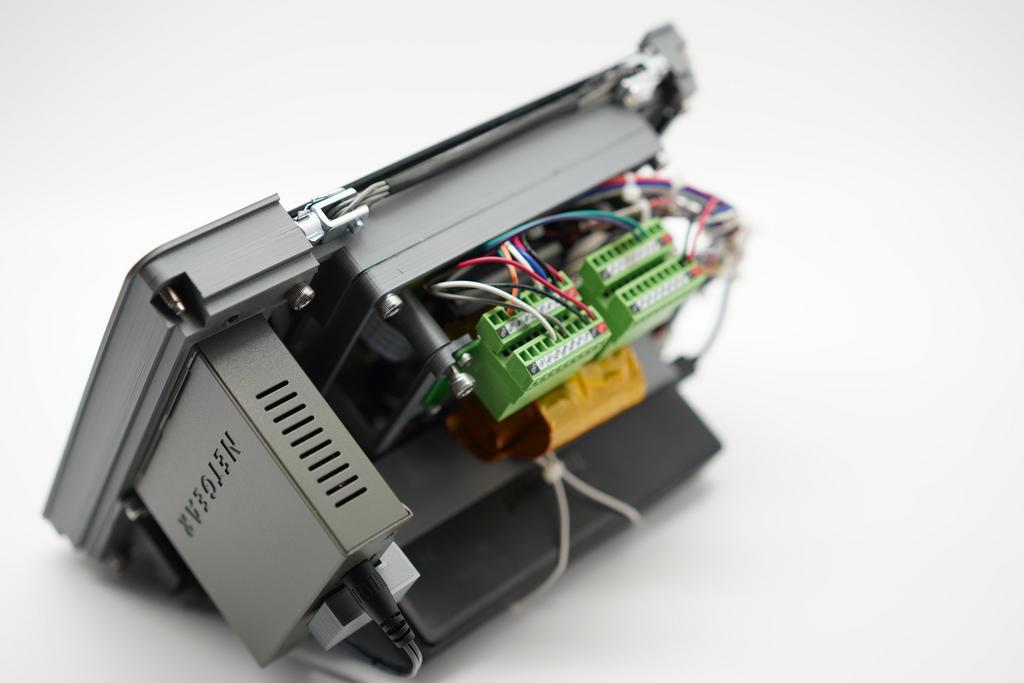
The setup.
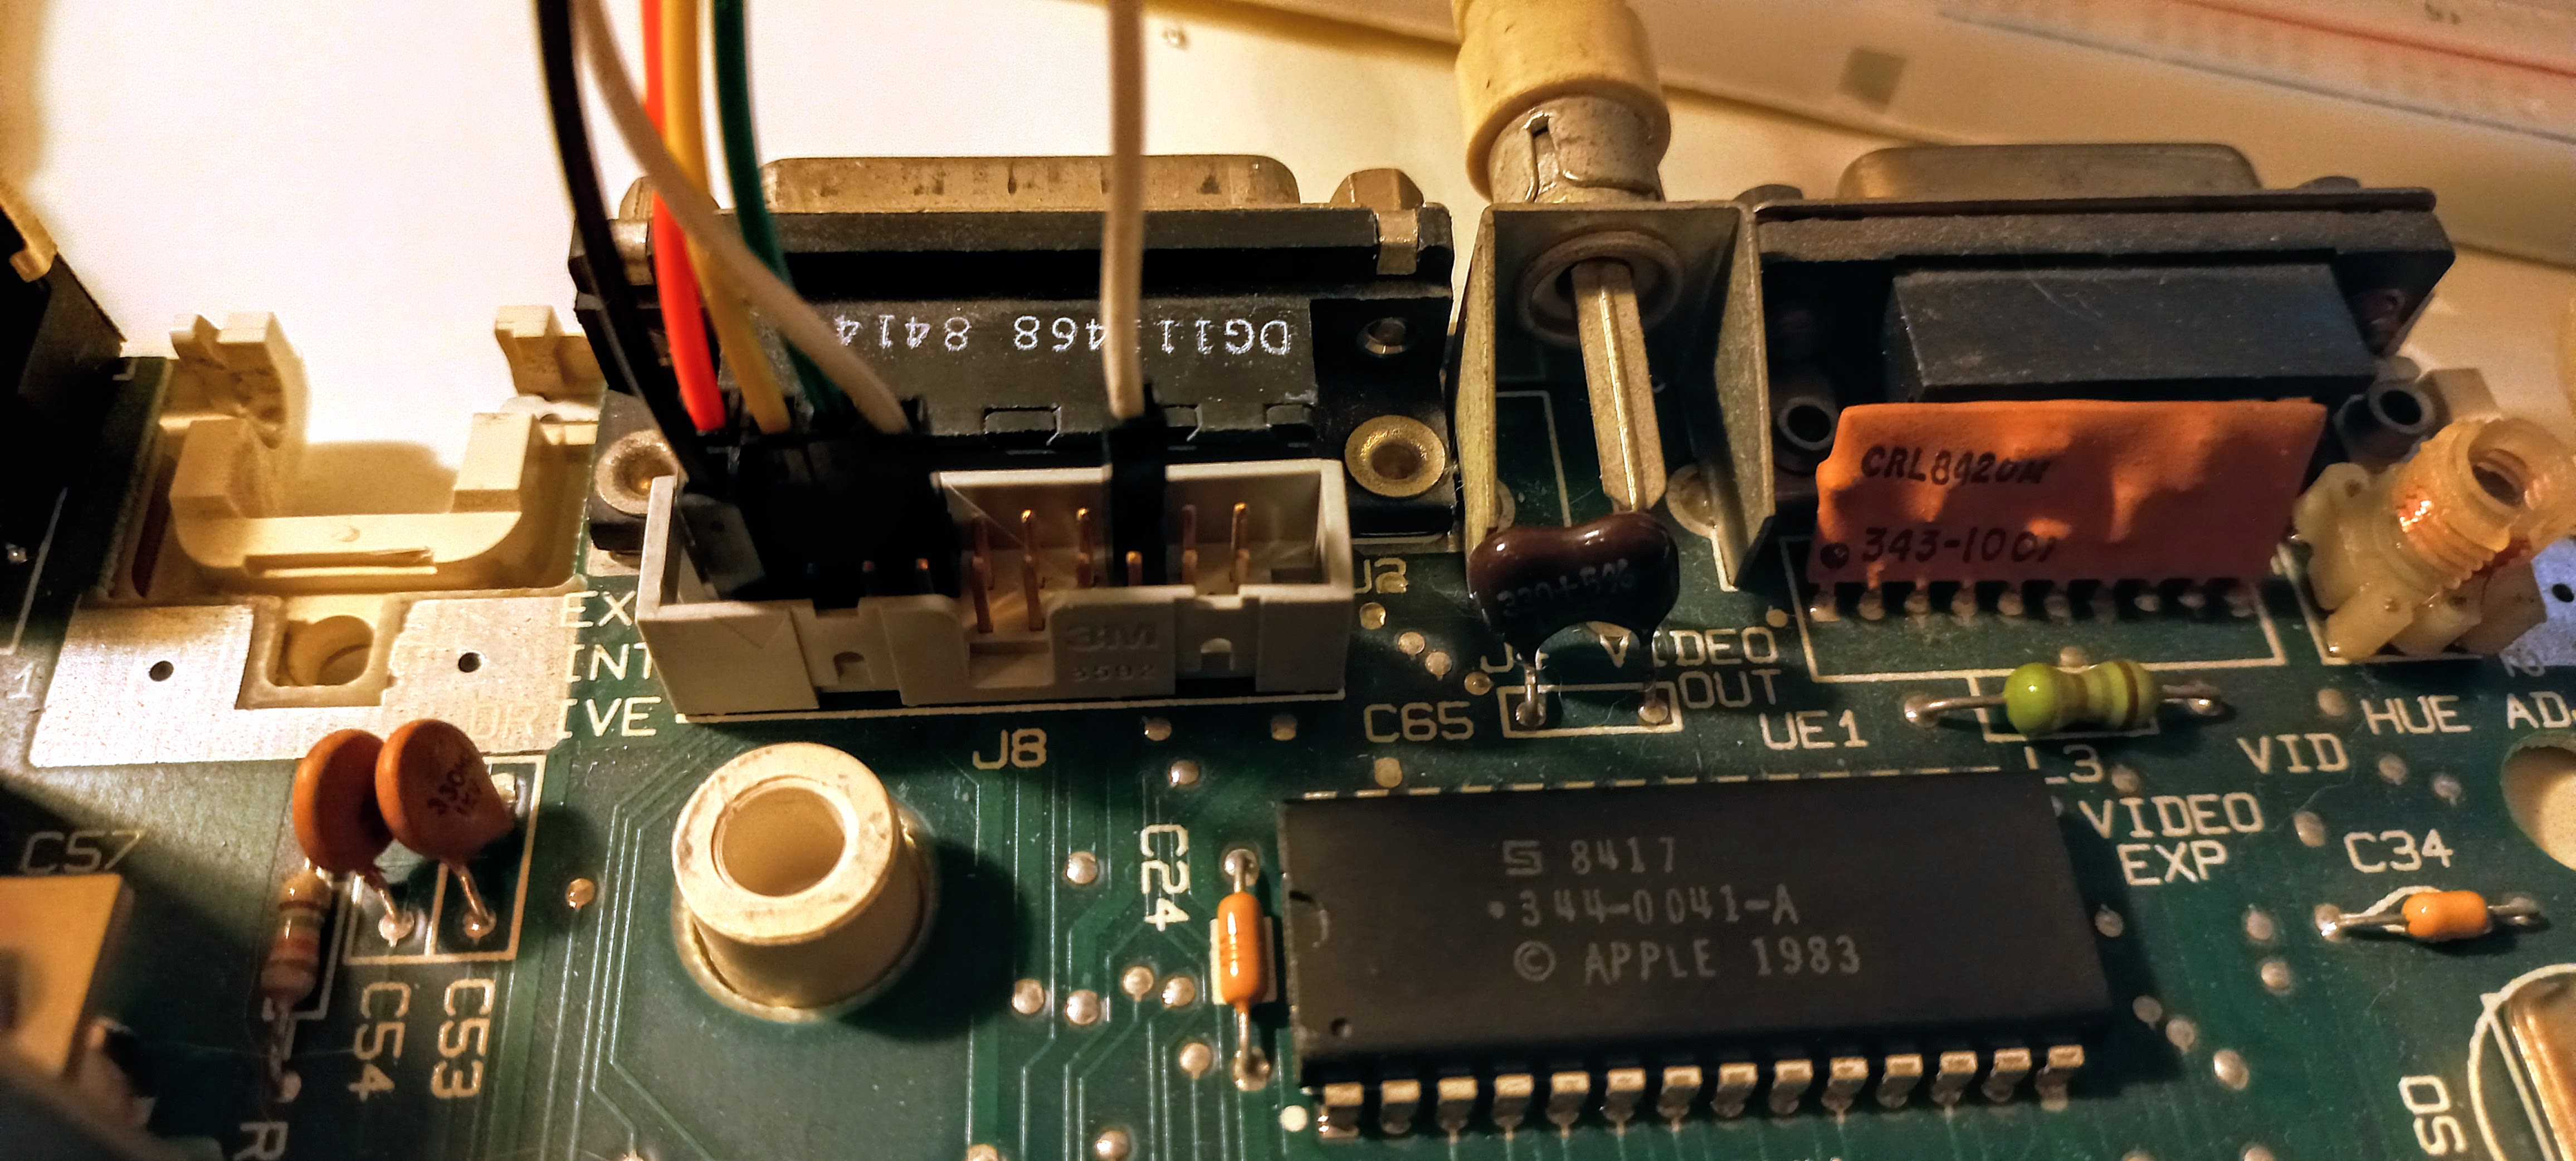
J8 connector on motherboard
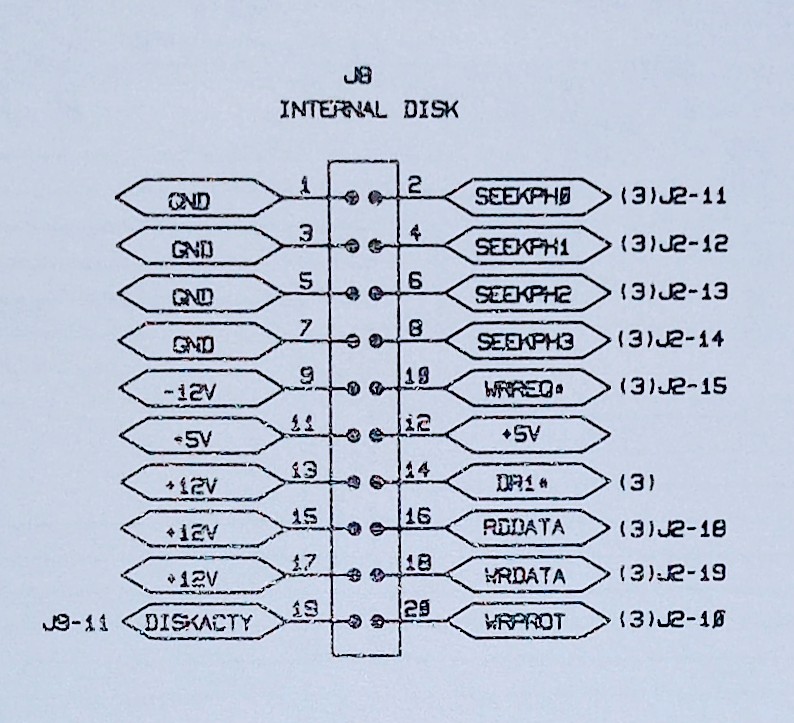
J8 connector pinout where drive 1 is connected to the Apple 2c
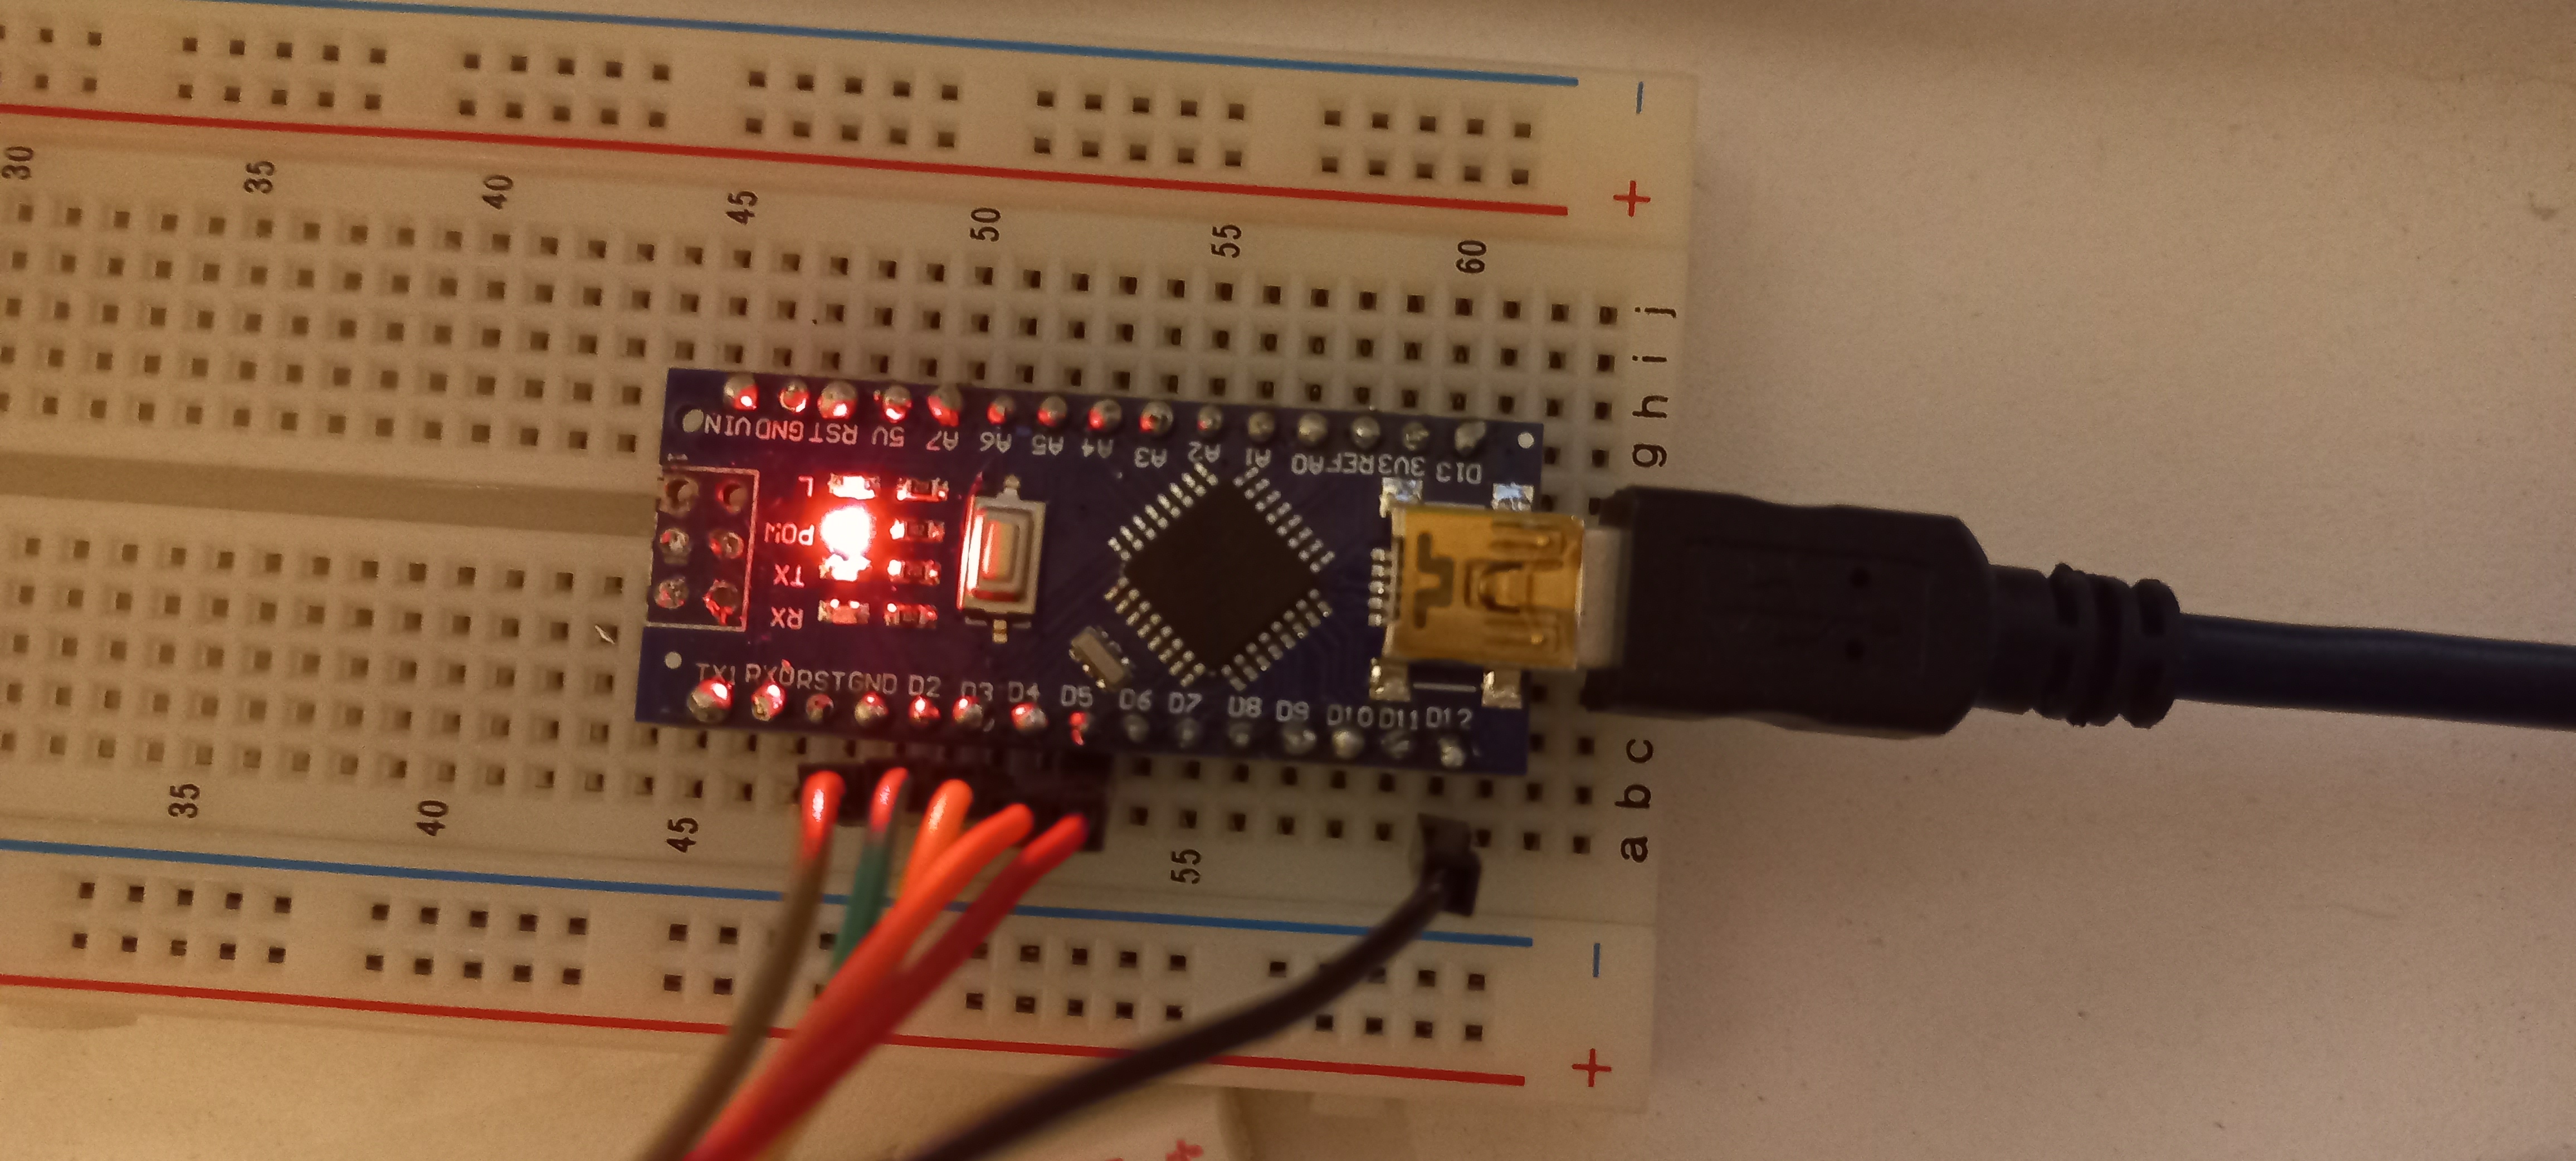
The Arduino Nano board and its pinnout
TheDraw Fonts
http://www.roysac.com/blog/2015/05/thedraw-ansi-fonts-update-for-may-2015/
- To view TDF files you can use
TDFFONTS.EXEwhich is included inTHEDRAWASCII/ANSI drawing app. - A huge collection of fonts: http://www.roysac.com/thedrawfonts-tdf.html
- A Windows Viwer for TDF files: http://www.roysac.com/blog/2014/09/thedraw-tdf-fonts-tool-version-1-2-release/
- My favorite font so far:
TheDraw Fonts File (.TDF) specification
TheDraw Fonts File (.TDF) Specifications - http://www.roysac.com/blog/2014/04/thedraw-fonts-file-tdf-specifications/
Here’s a copy:
    Note that this is not an official specifications document, I reverse engineered it by testing, so there might be cases I am unaware of, although I am pretty confident that I covered everything about it.

“TheDraw” Fonts Files have the extension “.TDF” (which is short for “TheDraw Font” duh :)).

One .TDF Fonts file is by default designed as a “collection” of multiple fonts, even if it only holds a single font (like after exporting a single font to an extra file). It can hold up to 34 fonts. More are not possible, if used with TheDraw itself or with it’s external TDFONTS.EXE Fonts Editor utility.

An empty fonts file without any font in it yet is always 232 bytes in size. The actual character data are always stored after those 232 bytes and can vary in size, depending on the size, type and complexity of the font characters. Every additional font added to the collection is 212 bytes long if without any character data.

Font Header
Offset	Length	Description	Sample Value
0	1	Character 19 (13h)	13
1	18	Fix String	TheDraw FONTS file
19	1	Character 26 (1Ah)	1A
20	4	Fix 4 Bytes Sequence Indicating the Start of a new Font Definition	55 AA 00 FF
24	1	Byte: Length of the Font Name (max. is 12 characters)	0B
25	12	Font Name (String). Only use the number of bytes specified in byte 24 and ignore any after (it might be 00 values or maybe garbage)	MY NEW FONT
37	4	unused as far I know. Typically all 0 bytes	00 00 00 00
41	1	Font Type (byte): 00 = Outline, 01 = Block, 02 = Color	02
42	1	Letter Spacing: 01h – 29h, representing the range 0-40 as decimal values	01 … 29
43	2	Block Size (Word, Little Endian) Size of character data after main font definition block, including terminating 0 if followed by another font (last font in collection is not Null terminated)	7F 04 (= 1,151)
45	188	2 bytes (Word, Little Endian) for each character from ASC(33) (“!”) to ASC(126) (“~”) (94 characters total) with the offset (starting at 0) after the font header definition where the character data start (e.g. 0 would mean that character data start at byte 233 [for the first font in the file only])	FF FF = char not defined
233	BlockSize	Character Detail Data	??
The Characters

  !"#$%&'()*+,-./0123456789:;<=>?@ABCDEFGHIJKLMNO
  PQRSTUVWXYZ[\]^_`abcdefghijklmnopqrstuvwxyz{|}~
Offset Addresses

Font 1 Header	20
Font 1 Data	233
Font 2 Header	232 + Font 1 Block Size + 1
Font 2 Data	Font 2 Header + 212 + 1
Font 3 Header	Font 2 Data + Font 2 Block Size + 1
Font 3 Data	Font 3 Header + 212 + 1
Font X …	…


Font Character
Offset	Length	Description	Sample Value
0	1	Max Width of Character ( 1 <= W <= 30 (1Eh) )	0A
1	1	Max Height of Character** ( 1<= H <= 12 (0Ch) )	05
** The Max Height Value is not reliable. If a line ends with a &, this line is not counted in the Max Height. For Example, if a character is 6 lines high and line 5 and line 4 end with a & character, the value for Max Height will be 4 and not 6. The Max Height value can only be used to determine the “Line Height” to determine where to position the cursor after a line-break. To read the full character data, always read to the Null (Chr(0)) terminator.

Byte 1 (All Font Types)
The individual characters for Fonts of type “Block” or “Outline” are single bytes only where “Block” using the actual ASCII character code. For Fonts of type “Color“, each character takes up 2 bytes. The first byte is the character itself and the 2nd byte is to specify the background and foreground colors used for the character. “Outline” Font Types store Letters, which are used as character reference. For visualization purposes you might want to use the following mapping.

Letter	??	Chr Dec/Hex	Description	Out-/Inside
A	???	205 / CD	??	??
B	???	196 / C4	??	??
C	???	179 / B3	??	??
D	???	186 / BA	??	??
E	???	213 / D5	Upper-left outer corner
Up-to-Right outer corner	outside
inside
F	???	187 / BB	Upper-right outer corner
Right-to-Down outer corner	outside
inside
G	???	214 / D6	Up-to-Right inner corner
Upper-left inner corner	outside
inside
H	???	191 / BF	Right-to-Down inner corner
Upper-right inner corner	outside
inside
I	???	200 / C8	Lower-left inner corner	inside
J	???	190 / BE	Lower-right inner corner	inside
K	???	192 / C0	Lower-left outer corner	outside
L	???	189 / BD	Lower-right outer corner	outside
M	???	181 / B5	??	??
N	???	199 / C7	??	??
O	???	247 / F7	Hard space for all spaces inside a character	??
@	@	064 / 40	Filler for all leading spaces	??
&	&	038 / 26	Descender mark	??


Byte 2 (“Color” Font Type Only)
00 - FF, the first part (or Floor(Value / 16)) holds the background color (0,1,2,3 .. max. 7) and the second part (or Value mod 16) holds the foreground color (0,1,2,3 .. max. F). See the Color Table below for the available colors.


The end of each line in the character is terminated by the Carriage Return character (ASC(13) or 0Dh)

A character value = 0 (Null) indicates the end of the current character (Note: that a color value of “00” for fonts of type “Color” is perfectly legal and should not be interpreted as Null termination).


General Notes
If the current line is being terminated before the specified “Max. Width” is reached, everything after the break will be treated as non-existent or transparent space. I tried to illustrate this behavior in the following drawing.
If the characters of your “Color” font are too large, TheDraw might run into a problem because the space needed exceed the maximum possible offset value in the font base definition. Keep in mind that only 2 bytes are reserved, providing a max. offset of 65534 (=FEh, remember that FFh = no character defined). Taking a color font using 2 bytes per char and maximum dimensions per character of 30×12 + up-to 11 line-breaks and 1 null termination for a total of 94 characters, you are running out of address space much earlier than the end of character 93.
Remember that the “Outline” font type has restrictions regarding the use of characters. Those rules are enforced by the font-editor tool though and not by the font file format, so be careful, if you are going to create new .TDF font files yourself.
If a character is created using the “Copy” character feature by the TDFonts.exe font editor, the target character will point to the same offset position for the character data as the source character. Only if the target character is changed afterwards will the character data be stored at a different offset location. This reduces space and can be solution for the address space issue mentioned at the first bullet point.


From the TheDraw Documentation
Outline Fonts

?????????????????????????????????????????????
??? ????????????????????????????????? ???     ????????????         Horizontal Beam
??? ??????????????? ??????????????? ???     ???  ???           ?????????????????????????????????
??????????????? ??? ??? ???????????????     ???  ???           ?????????????????????????????????
    ??? ??? ??? ???         ???  ???
    ??? ??? ??? ???         ???  ??? <?????? Vertical Beam
    ??? ????????? ???         ????????????
    ?????????????????????
Pay special attention to how the top/right of the outside border, and the bottom/left of the inside border were done. Of particular importance are the corners. The following characters must be used in the described locations.

For outside borders:
???     Upper???left outer corner
???     Upper???right outer corner
???     Lower???left outer corner
???     Lower???right outer corner
???     Up???to???Right inner corner
???     Right???to???Down inner corner

For inside borders:
???     Upper???left inner corner
???     Upper???right inner corner
???     Lower???left inner corner
???     Lower???right inner corner
???     Up???to???Right outer corner
???     Right???to???Down outer corner
In general the drawing rules are:

Double lines are always the rightmost side of a column.
Double lines are always the topmost side of a beam.
RESERVED CHARACTERS
The reserved characters are for solid spaces and descender line markers. Typically solid spaces are used to fill the inside of columns and beams. These are drawn with “???” characters. ie:

              ??????????????????????????????  ??????????????????????????????
              ??????????????????????????????  ??????????????????????????????      Note that solid
              ??????????????????????????????  ??????????????????????????????      spaces are always
              ??????????????????????????????  ????????????  ????????????      visible in TDFonts
              ??????????????????????????????  ??????????????????????????????        editor verses the
              ??????????????????????????????  ??????????????????????????????      TheDraw editor).
              ????????????  ????????????  ??????????????????????????????
                               ????????????&
TheDraw specially tracks descenders so to align symbols and handle carriage returns properly. A carriage return should move the same number of lines for either A’s or Q’s for instance. If decenders were not marked, following kind of alignment error occurs:

                   ???????????????   ???????????????
                   ???   ???   ???   ???
                   ???????????????   ???????????????
Symbols demanding descenders should be marked as shown in the above “Q” symbol. Lines marked with ampersands are not counted when TheDraw aligns the symbols. Font symbols typically needing the descender marks are:

                $ , ; _ Q g j p q y
Others symbols may require them also, depending on how your font is designed or implemented.